Clear The DNS Cache on Android Devices: If you’re asking the same question, here’s the definitive answer. Many often must clear the DNS cache on Android phones to check something. For example, you are an administrator of your website and have moved from one server to another.
So, right after changing the nameservers, even though you can use the online DNS checker, you need to switch from the existing DNS server to another server to check whether the new nameservers are up. When a browser cannot connect to any other working website, it means that there is some problem with your DNS cache. To fix this, you need to flush the DNS cache to fix, and the website should start loading.
Also Read: How To Use ChatGPT For Amazon Affiliate Marketing In [2025]
So if you are facing a connection problem, follow the tutorial and clear the DNS cache on your android device. We’ve added several solutions, including a root method and changing DNS servers. So to clear the DNS cache from Android tablets and phones, follow the guide below.
Flush DNS Cache on Android Devices [2025]
There are different ways to Clear The DNS Cache on Android Devices. However, the following procedures are well documented and proven.
1. Clear site storage :
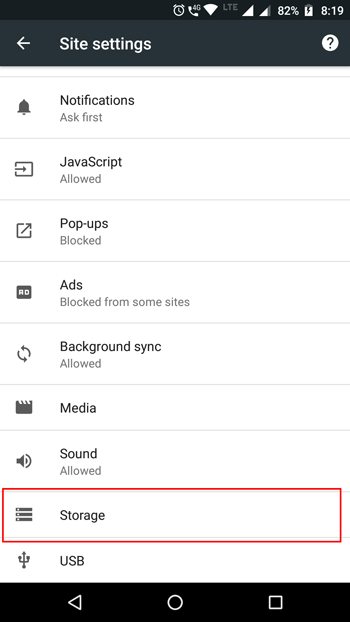
This is the most straightforward task to clear the DNS cache on an Android mobile phone. Every time you visit a website, it saves a few things in the browser. Sometimes they’re called cookies, and sometimes they’re known as caches. However, you can remove them both from the browser. Browsers now have different methods for clearing site storage or deleting cache and cookies. In Google Chrome,
- go to Settings
- Site Settings
- Storage
- You will find an option called “Clear Site Storage.”
- Tap on that button and: select the favorable option to clear site storage in Google Chrome.
If you’re using Mozilla Firefox,
- go to Settings
- Privacy
- You will find the “Clear Now” button under Clear Private Data and select it.
After that, you will get an option to choose what to delete and what not to delete. Select what you want to delete and tap on the “Clear Now” button.
2. Delete Cache from Android Settings:
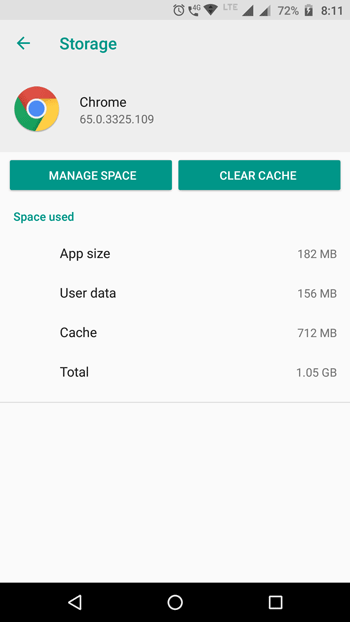
Although various ROMs or manufacturers have this opportunity in different places, you can get the same option after opening the app settings. Here you can disable, uninstall, force stop the app, and clear the cache and all data.
You’ll need to go to Settings > Apps if you’re using stock Android. You should find Google Chrome or Firefox or the browser you use here. After opening the app settings, go to “Storage” and press the “Clear Cache” button to clear the DNS cache on the Android phone.
3. Clear the DNS Cache in Google Chrome
Google Chrome is the in-built browser on Android devices but also controls many system operations in the background. If you are a frequent Chrome user, you can instantly flush the DNS cache on Android using a concealed Chrome URL.
- Initially, open Chrome on your Android device and type the below path. Then, press Enter.
- It will take you to the DNS lookup page. Here, tap on the button “Clear Host Cache” to flush the DNS cache from your Android device.
- Clearing the DNS cache using this button should not take more than a second. It would be best if you tapped that. If you get a popup menu, select “Clear Cache” and “Flush Socket”.
4. opt for Static IP to DHCP
The main reason to select static IP is that you need to use a Google DNS server rather than your server. This explanation works when you are linked to a Wi-Fi network. If you are currently connected to any Wi-Fi network, select the network and select “Modify Network”. If you are using a different ROM than the stock Android, you can get the same option but in a different way.
In the popup menu, you can find “IP Settings“. By default, this should be DHCP. Select Static and enter the following DNS servers;
DNS 1: 8.8.8.8
DNS 2: 8.8.4.4
Save your settings and check if your DNS cache has been removed.
Also Read: ChatGPT’s Subscription Package Can Now Be Bought in India
5. Change the DNS using DNS Changer
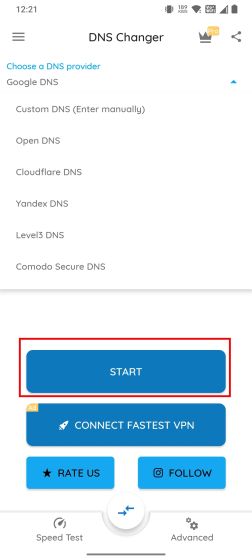
If the above method doesn’t suit you, you can use a third-party app called DNS Changer. No root is required, which is this app’s plus point. So, you can use this app on any Android mobile without root. After opening this app, you will find an option to manually enter the DNS server or choose any of the following DNS servers;
- Google DNS
- Open DNS
- Yandex DN
- Slevel3 DNS
Choose any of the DNS servers mentioned above and press the start button. This will take a few moments to complete. You won’t reconnect to your existing network, so you’ll be able to browse the web fresh and without any old caches.
- Install the DNS Changer app, which is free, and offers in-app purchases) from Play Store on your Android device. Now, open it and select Custom DNS Server from the list.
- Finally, click on “Start“, and you are done. As the app uses Android’s VPN API to route all traffic through a custom DNS server, you’ll get a popup to authorize the VPN connection.
- Unlike VPN apps, it doesn’t use many system resources and routes traffic locally, which is good.
- However, you can use Cloudflare’s WARP app (free, offers in-app purchases) directly to change DNS servers.
6. Use VPN to Flush the DNS Cache on the Android
If you use VPN, you can get rid of the DNS cache on Android mobile in no time. VPN uses a third-party network or server to display all the web pages you find in any web browser. Therefore, it will use a separate DNS server, and you will be done. So, choose a good, secure and trusted VPN app like Express VPN, Hotspot Shield etc.
Flush the DNS Cache on Android Devices applicable for Root Users
Clearing the DNS cache system-wide is possible only if you have rooted your Android phone. With a single command, you can easily flush the DNS cache in your Android phone. If you have already rooted your Android device, you can install Termux (Free) and grant Root permission to Termux through Magisk. After that, run the below commands to flush the DNS cache on your Android phone.
su ndc resolver clearnetdns wlan0/rmnet0
You may also like :-
- No Root Firewall App: Top 11 Best Apps For Security {2025}
- How do you Mirror Your Android Phone to a Chromebook?
Final Words:
These are the ways via which you can Clear The DNS Cache on Android Devices quickly on your android phone. If your browser cannot display a website and regularly throws a DNS lookup failed error, this tutorial will help you resolve the issues.

![How to Use ChatGPT Canva Plugin to Up Your Social Media Game [2025] How to Use ChatGPT Canva Plugin](https://techihd.com/wp-content/uploads/2025/01/Use-ChatGPT-Canva-Plugin.jpg)
![How to Use One WhatsApp Account on Two Phones in [2025] One Whatsapp In Two Phone](https://techihd.com/wp-content/uploads/2025/02/two-whatsapp-in-one-phone-218x150.webp)
![How to Install an Intel or AMD CPU on Your Motherboard [2025] How To Instal Intel Or AMD CPU On Your Motherboard](https://techihd.com/wp-content/uploads/2023/03/WhatsApp-Image-2023-03-03-at-14.49.36.jpg)
